User Guide
IPSec VPN (Inseego Connect)
You can create IPSec VPNs using Inseego Connect. All T-Mobile owned Inseego FX devices come with the option of purchasing the Inseego Connect Add-on. Please work with your Account team to order the Inseego Connect Add-on, which provides Manager access.
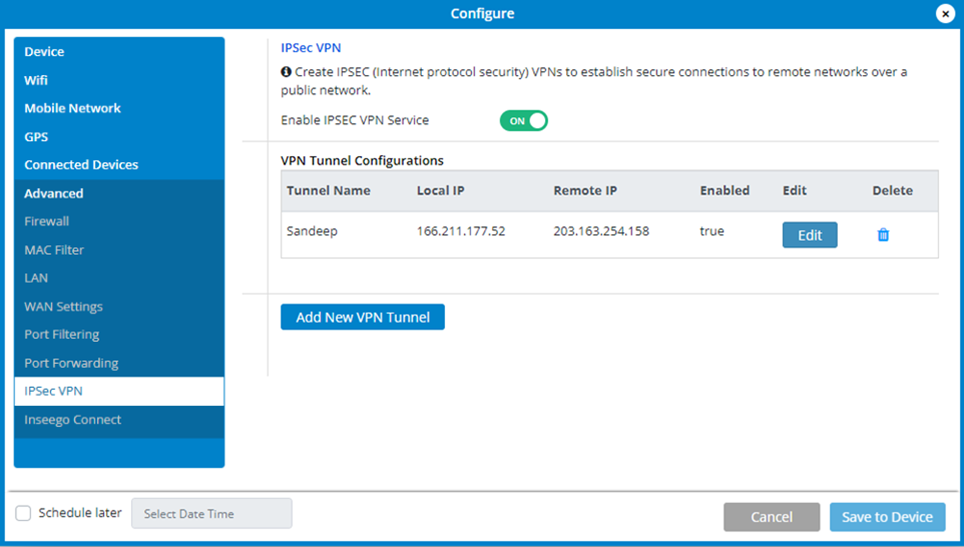
- Move the Enable IPSEC VPN Service slider to ON to enable IPSec VPN service.
When IPSec VPN service is enabled, established tunnel information displays. You edit or delete existing tunnels. - Click Add New VPN Tunnel to add a new VPN tunnel. The Add New VPN Tunnel Dialog appears.
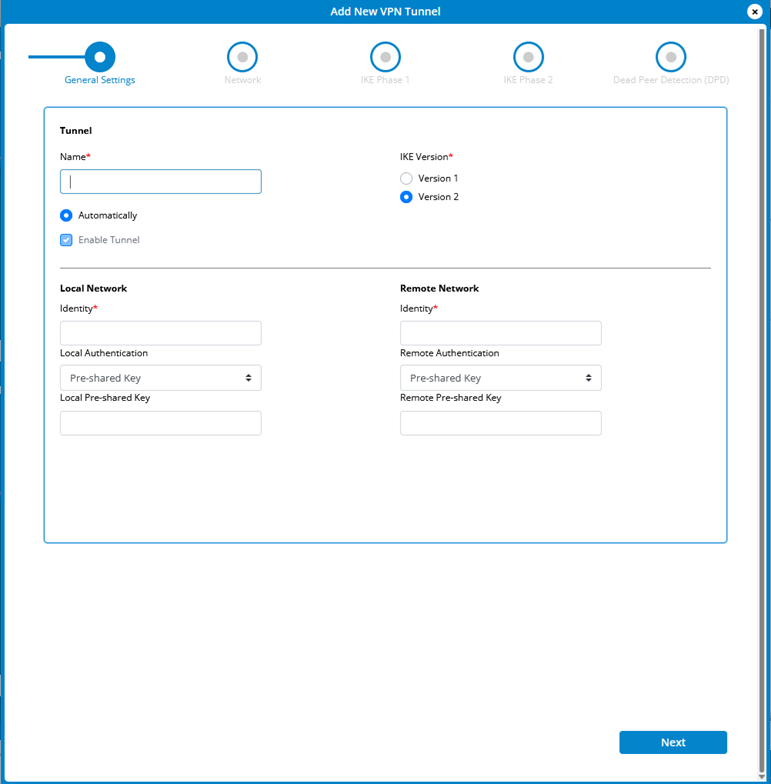
General Settings
Tunnel
- Name — Enter a unique name to identify this VPN.
- IKE Version — Choose an Internet Key Exchange (IKE) version. Version 1 is older. Version 2 (default) uses fewer messages, better supports network switching, and handles NAT-T natively.
- Enable Tunnel — Check this box to enable the tunnel. When selected, the tunnel starts automatically upon start up. When not selected, you must start the tunnel manually.
Local Network
- Identity — Enter a unique name to identify the local point of the tunnel.
- Local Authentication — Select a type of authentication from the drop-down list (Pre-shared Key, Certificate/Public Key, or None). You are prompted for further information based on your selection.
Remote Network
- Identity — Enter a unique name to identify the remote point of the tunnel.
- Remote Authentication — Select a type of authentication from the drop-down list (Pre-shared Key, Certificate/Public Key, or None). You are prompted for further information based on your selection.
Click Next.
Network
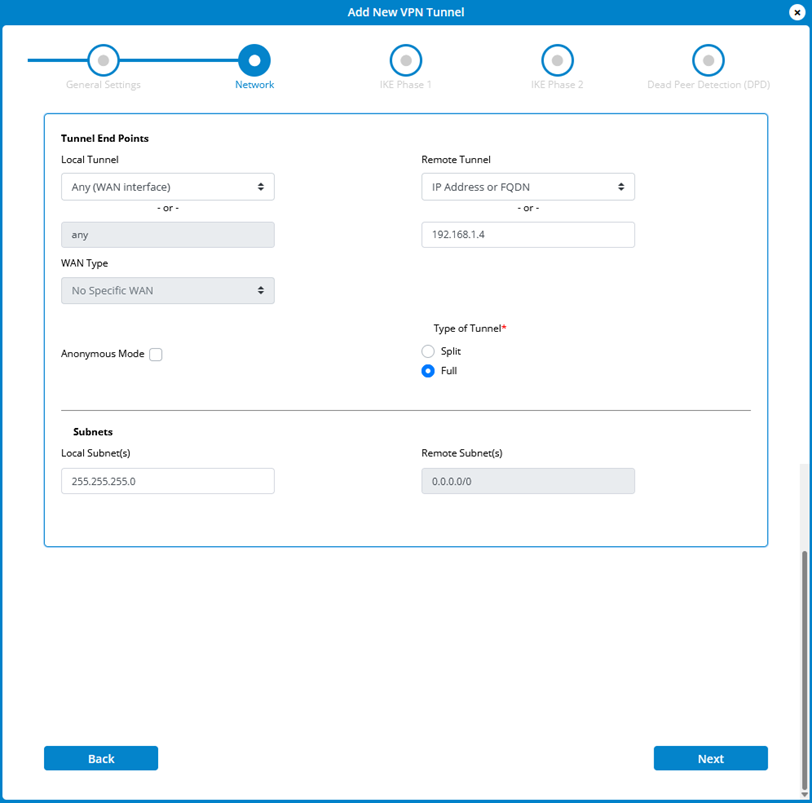
Tunnel End Points
- Local Tunnel – Select an option from the dropdown:
- Any (WAN interface): Allows the use of any WAN interface for the local tunnel.
- IP Address or FQDN: Enter the IP Address or Fully Qualified Domain Name (FQDN) in the Local IP text box.
- Specific WAN: Select a WAN type from the dropdown (WWAN or Ethernet WAN). - Remote Tunnel – Enter the IP address or FQDN of the remote tunnel.
NOTE: This field is not available if Anonymous Mode is checked.
- Anonymous Mode — When selected, remote devices with valid credentials can connect without providing network details. This allows for site-to-site or remote access VPNs where endpoints are not fixed by a static IP address.
- Type of Tunnel — Select whether the tunnel is split or full. A split tunnel only encrypts specific traffic while allowing other traffic to bypass the tunnel, which offers better speed and local network access but less security. A full tunnel encrypts and routes all traffic through the VPN.
Subnets
- Local Subnet(s) — Enter the subnet of the local device, for example: If your local IP is 192.168.0.100 and your subnet is 255.255.255.0 this should be 192.168.0.0/24.
NOTES:
- This should mirror what the subnet displays in the local device, for example: 192.168.0.0 / 255.255.255.0.
- The local device should be on a different subnet from remote, for example: If the Remote Subnet is 192.168.1.0/24, the Local Subnet might be 192.168.0.0/24. This is usually based off the DHCP settings of the devices.
- Remote Subnet(s) — Enter the subnet of the remote device, for example: If your remote IP is 192.168.1.100 and your subnet is 255.255.255.0 this should be 192.168.1.0/24.
NOTES:
- This should mirror what the subnet displays in the local device, for example: 192.168.1.0 / 255.255.255.0.
- The remote device should be on a different subnet from local, for example: If the Local Subnet is 192.168.0.0/24, the Remote Subnet might be 192.168.1.0/24. This is usually based off the DHCP settings of the devices.
Click Next.
IKE Phase 1
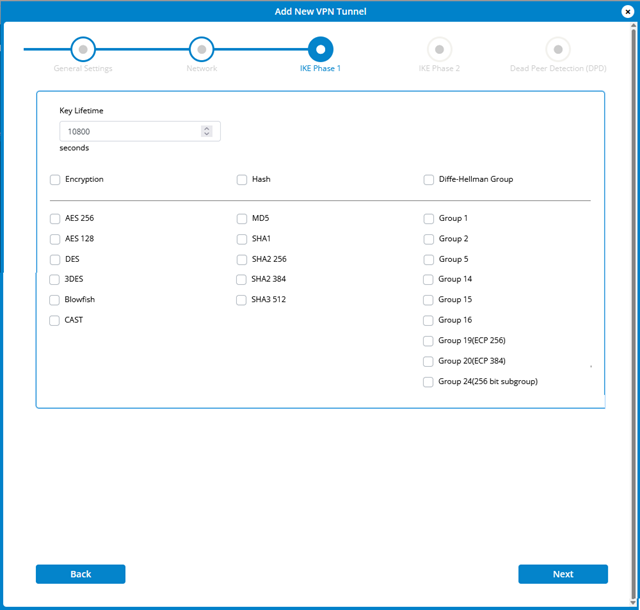
- Key Lifetime — The lifetime of the phase 1 key, in seconds.
- Encryption/Hash/Diffe-Hellman Group — Select desired items from each column or select the checkbox at the top to select all items in the column.
NOTE: Each phase should support at least one matching option in each column. For example, if Phase 1 on this page is configured to support Hash SHA2 512, SHA2 384, and SHA2 256, then at least one of those selections must be selected in Phase 2 on the next page in order to be a common hash.
Click Next.
IKE Phase 2
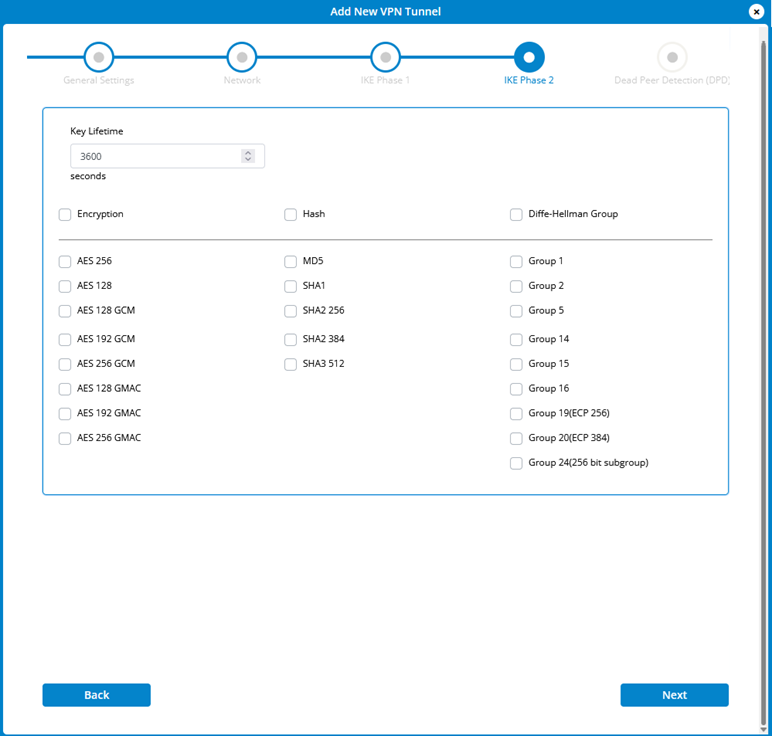
- Key Lifetime — The lifetime of the phase 2 key, in seconds.
- Encryption/Hash/Diffe-Hellman Group— Select desired items from each column or select the checkbox at the top to select all items in the column.
NOTE: Each phase should support at least one matching option in each column. For example, if Phase 1 on the previous page is configured to support Hash SHA2 512, SHA2 384, and SHA2 256, then at least one of those selections must be selected on this page to be a common hash.
Click Next.
Dead Peer Detection (DPD)

Dead Peer Detection (DPD) is a keep-alive method that ensures the tunnel is up and takes action if it is not able to reach the remote side of the tunnel, depending on what DPD action you select. You can use the default values, if desired.
- Enable — Check this box to enable DPD.
- DPD Action — Use the drop-down to select a DPD action.
- DPD Delay — The number of seconds between DPD packets.
- DPD Timeout — The number of seconds the router will allow an IPSec session to be idle before beginning to send DPD packets to the peer machine.
Click Finish. The new VPN tunnel is displayed on the IPSec VPN page.
If you want changes to go into effect at a later time, check the Schedule later box and select a date and time from the calendar. Once all your changes are made, select Save to Device.


