User Guide
Restrict Internet Access For Applications
This section allows you to block outgoing internet connections and permit only selected applications to access the internet using port filtering.
NOTE: When IP Passthrough is turned on, port filtering capabilities are set through the connected host routing system, and you cannot enable port filtering. Go to Network > LAN to turn IP Passthrough off.

Port Filtering: To enable port filtering and select which applications can access the internet, move the slider to on.
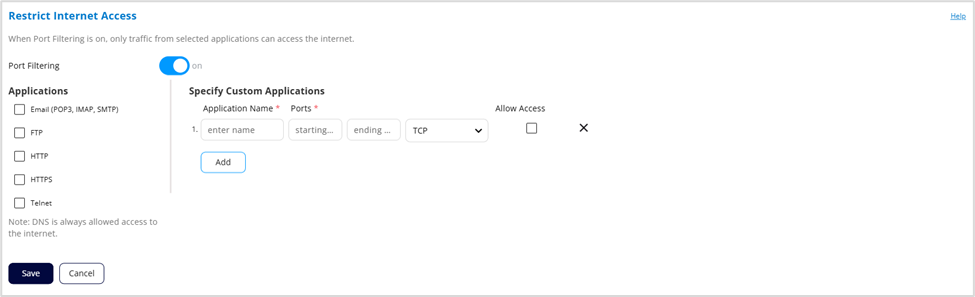
Applications
Only traffic from applications you select can access the internet. Some applications are pre-defined. Select the applications you want to be able to access the internet.
The following table provides port numbers and protocol information for each pre-defined application listed.
| Application | Port | TCP* | STCP* | UDP* |
|---|---|---|---|---|
| Email (POP3) | 110 | Yes | No | Assigned |
| Email (POP3S) | 995 | Yes | No | Yes |
| Email (IMAP) | 143 | Yes | No | Assigned |
| Email (IMAPS) | 993 | Yes | No | Assigned |
| Email (SMTP) | 25 | Yes | No | Assigned |
| Email (SecureSMTP) | 465 | Yes | No | No |
| FTP control (command) | 21 | Yes | Yes | Assigned |
| FTP data transfer | 20 | Yes | Yes | Assigned |
| HTTP | 80 | Yes | Yes | Assigned |
| HTTPS | 443 | Yes | Yes | Assigned |
| Telnet | 23 | Yes | No | Assigned |
*Yes - indicates the protocol is standardized for the port number.
No - indicates the protocol is not standardized for the port number.
Assigned - indicates the port number is assigned by IANA (Internet Assigned Numbers Authority) for protocol use but may not be standardized. |
Specify Custom Applications
You can define your own applications (up to 25) and then turn them on or off as needed.
Application Name: Enter a name for the custom application.
Ports:
- starting - Enter the beginning of the range of port numbers used by outgoing traffic for the custom application being added.
- ending - Enter the end of the range of port numbers used by the application.
NOTE: If the application uses a single port instead of a range, type the same value in both the starting and ending text boxes.
Protocol: Select the protocol used by the port range from the dropdown list (TCP, UDP, or both).
Allow Access: Check the box if you want the new application to be able to access the internet.
Click the X to delete a custom application.
Use the Add button to add a new row to the custom application list.
Click Save to save your changes.


