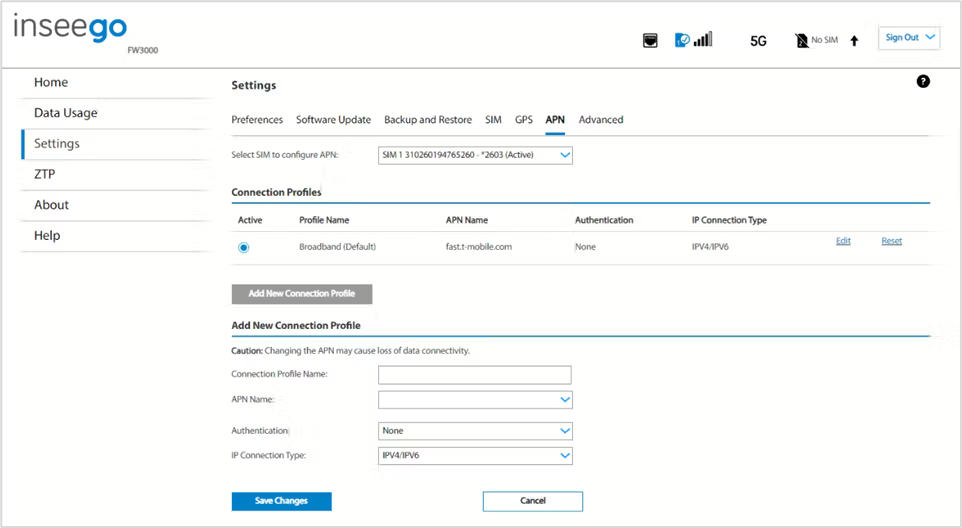
APN tab
In most configurations, the FW3000 is used with a dynamic IP and SIM and the Access Point Name (APN) is available from the network, for example: internet. However, if you are on a private network, you may need to configure connection profiles for your APN on this tab for the network to communicate with the FW3000.
NOTE: The APN must match the APN provisioned in your service provider billing.

Select SIM to configure APN: Use the drop-down to select the SIM on which you want to configure the APN.
Connection Profiles
NOTE: Initially, the default APN profile is displayed. You cannot delete this profile, but you can edit it and/or add additional profiles.
Active: Select the connection profile you want to be active.
Profile Name: The name that identifies the connection profile.
APN Name: The access point name.
Authentication: The authentication method for the connection profile.
IP Connection Type: The IP connection type for the connection profile.
Click Edit to edit a profile.
Click Reset to reset a profile to default values.
Click the Add New Connection Profile button to add an additional APN connection profile.
Add New Connection Profile
Connection Profile Name: Enter a name to identify this connection profile.
APN Name: Select an APN supplied by your service provider from the drop-down or select Add APN and enter the APN for your private network in the text box that appears below.
CAUTION! Changing the APN may cause a loss of data connectivity.
NOTE: Information entered in the following fields should come from your service provider based on network requirements.
Authentication: Select the authentication method for your private network from the drop-down (PAP, CHAP, PAP/CHAP, or None).
Username: Enter the username for your private network. NOTE: This option is not visible when Authentication is set to None.
Password: Enter the password for your private network. NOTE: This option is not visible when Authentication is set to None.
IP Connection Type: Select an IP connection type from the drop-down (IPv4, IPv6, or IPv4/IPv6).
Click Save Changes.
