User guide
Port Forwarding tab
Port Forwarding allows specific applications to be forwarded to a particular device connected to your network. Normally, the built-in firewall blocks incoming traffic from the internet. Port forwarding allows internet users to access any server you are running on your computer, such as a web, FTP, or Email server.
IMPORTANT: Port forwarding creates a security risk and should not be turned on unless it is required.
NOTE: To configure Port Forwarding, you need a static IP address assigned to your line of service. Contact your service provider to set up a line of service for static IP.
Some mobile networks provide you with an IP address on their own network rather than an internet IP address. In this case, Port Forwarding cannot be used, because internet users cannot reach your IP address.
NOTE: When IP Passthrough is turned on, port forwarding capabilities are set through the connected host routing system. Settings on this page are not available. Go to Advanced > LAN to turn IP Passthrough off.
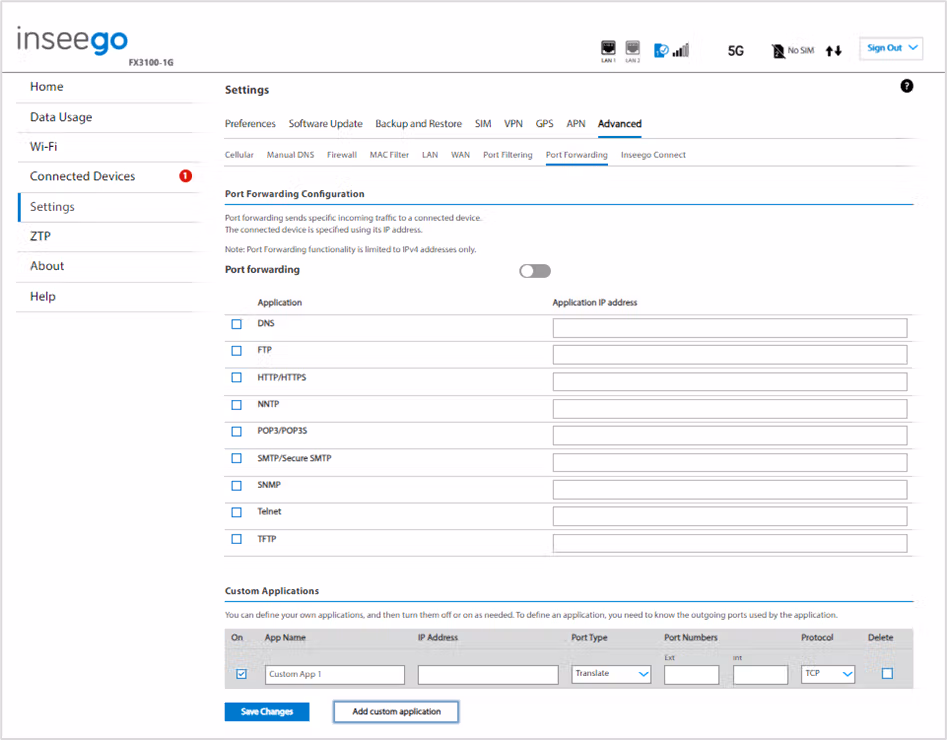
Port Forwarding Configuration
Port forwarding: To turn on port forwarding, move the ON/OFF slider to ON. To turn off port forwarding, so that no inbound traffic is forwarded to a LAN client, move the slider to OFF.
Applications
Check the box next to each Port Forwarding application that you want to allow.
To forward all inbound WAN traffic on a specific port to a single LAN client, enter the IP address of the target device in the Application IP address field.
The following table provides port numbers and protocol information for each port forwarding application listed.
| Application | Port | TCP* | STCP* | UDP* |
|---|---|---|---|---|
| DNS | 53 | Yes | No | Yes |
| FTP control (command) | 21 | Yes | Yes | Assigned |
| FTP data transfer | 20 | Yes | Yes | Assigned |
| HTTP | 80 | Yes | Yes | Assigned |
| HTTPS | 443 | Yes | Yes | Assigned |
| NNTP | 119 | Yes | No | Assigned |
| Email (POP3) | 110 | Yes | No | Assigned |
| Email (POP3S) | 995 | Yes | No | Yes |
| Email (SMTP) | 25 | Yes | No | Assigned |
| Email (SecureSMTP) | 465 | Yes | No | No |
| SNMP | 161 | Assigned | No | Yes |
| Telnet | 23 | Yes | No | Assigned |
| TFTP | 69 | Assigned | No | Yes |
*Yes - indicates the protocol is standardized for the port number.
No - indicates the protocol is not standardized for the port number.
Assigned - indicates the port number is assigned by IANA (Internet Assigned Numbers Authority) for protocol use but may not be standardized. |
Custom Applications
Use the Add custom application button to add a new row to the custom application list. You can add up to ten custom applications. Once defined, these applications can be turned on and off the same way as pre-defined applications.
- On: Check this box if you want the new application to be able to access the internet (enabling port forwarding).
- App Name: Enter a name for the custom application.
- IP Address: If you want to limit service for the application to a single connected device, enter the IP address of the target device. To find the IP address of a device, go to the Connected Devices page. NOTE: To ensure the device you are forwarding to does not have a different IP address after a reboot, either statically assign the IP address on the client device or set up a DHCP reservation.
- Port Type: Use Translate as the port type.
- Port Numbers: Use the From and To fields to specify the range of port numbers to be forwarded. NOTE: If the application uses a single port instead of a range, type the same value in both the From and To fields.
- For translate ports, use the Ext. and Int. to specify ports.
NOTE: Forwarding takes inbound traffic on a port to the same port on a client device. Use translate ports to send traffic to a different port on the client device. For example, instead of having inbound traffic on port 1234 forward to port 1234 of the client device, you can have it forward to port 5678. - Protocol: Select the protocol used by the port range from the drop-down list (TCP, UDP, or both).
- Delete: Check this box to delete a custom application. NOTE: Click on the Port Forwarding tab again to remove deleted custom applications from view on the screen.
Click Save Changes to save any changes made to the custom applications.


