User guide
LAN tab
This tab provides settings and information about the MiFi local area network (LAN). The LAN consists of the MiFi and all Wi-Fi, USB, and Ethernet connected devices.
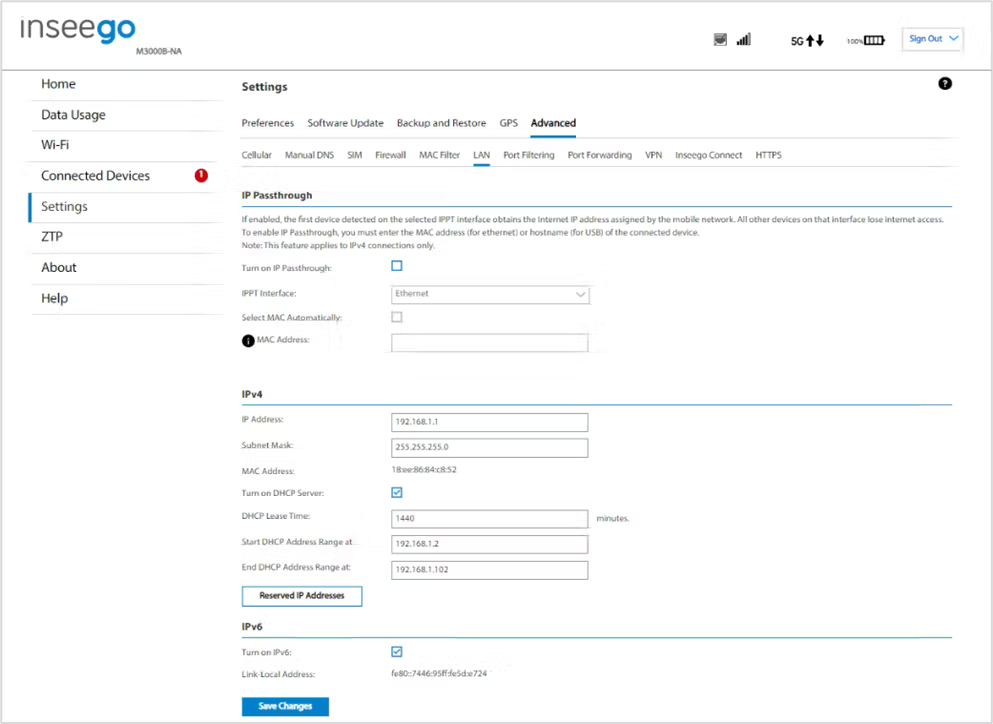
IP Passthrough
IP Passthrough (IPPT) enables the first device detected on the specified interface to obtain the IP address assigned by the mobile network. IPPT allows you to enable a one-to-one connection to a host routing system.
NOTE: When IP Passthrough is on, devices on other interfaces function normally. However, when IPPT is enabled, the following capabilities are set through the host routing system and web UI settings are not available:
- Port Forwarding
- Port Filtering
- DMZ (Firewall)
Turn on IP Passthrough: Check the box to enable IP Passthrough.
IPPT Interface: Select the interface used by the network device you wish to become the IP Passthrough device.
NOTE: The Ethernet port is disabled by default. You can enable it on Settings > Preferences.
Hostname: When enabling IPPT on the USB interface, enter the hostname of the device connected for IP Passthrough or click the Select Hostname Automatically checkbox*. This is the only USB-connected device that can obtain the IP address assigned to the mobile network. You can view the hostname on the Home or Connected Devices page.
MAC Address: When enabling IPPT on the Ethernet interface, enter the MAC address of the device connected for IP Passthrough or click the Select MAC Automatically checkbox*. This is the only Ethernet-connected device that can obtain the IP address assigned to the mobile network.
IPv4
IP Address: The IP address for your MiFi, as seen from the local network. Normally, you can use the default value.
Subnet Mask: The subnet mask network setting for the MiFi. The default value 255.255.255.0 is standard for small (class "C") networks. If you change the LAN IP Address, make sure to use the correct Subnet Mask for the IP address range of the LAN IP address.
MAC Address: (read-only) The Media Access Controller (MAC) Address for the Wi-Fi interface on your MiFi. The MAC address is a unique network identifier assigned when a network device is manufactured.
Turn on DHCP Server: This checkbox turns the DHCP Server feature on or off. This should be left checked. The DHCP server allocates an IP address to each connected device.
NOTE: If the DHCP Server is turned off, each connected device must be assigned a fixed IP address.
DHCP Lease Time: The number of minutes in which connected devices must renew the IP address assigned to them by the DHCP server. Normally, this can be left at the default value, but if you have special requirements, you can change this value.
Start DHCP Address Range at: The start of the IP address range used by the DHCP server. If the IP is set on the client device, use an IP address outside of this DHCP range; if the IP address is set using an IP reservation, it will usually be inside this range.
NOTE: Only expert users should change this setting.
End DHCP Address Range at: The end of the IP address range used by the DHCP server. If the IP is set on the client device, use an IP address outside of this DHCP range; if the IP address is set using an IP reservation, it will usually be inside this range.
NOTE: Only expert users should change this setting.
Reserved IP Addresses: Use this button to set up reserved IP addresses. Reserved IP addresses ensure that a connected device will always be allocated the same IP Address.
IPv6
Turn on IPv6: Check this box if any of your connected devices support IPv6. This enables IPv6 connected devices to make IPv6 connections to the internet.
Link-Local Address: The Link-Local IPv6 address if the connected device supports IPv6.
Click Save Changes to activate and save new settings.
| *This option may not be available on some devices. |


