User Guide
Pairing your X700 mesh node
Key things to know before connecting a mesh node with a router:
- Both the router and mesh node must be powered on and ready to pair.
- The router and mesh node should be within 10 to 50 feet of each other when connecting via Wi-Fi. You'll position the mesh node after connecting.
- Pairing actions on the router and mesh node must occur within 30 seconds of one another when pairing via Wi-Fi.
- The multicolor LED on the X700, and the device display and Wi-Fi status LED
 on the router help guide the pairing process.
Pairing
To pair an X700 mesh node to your router:
- Power on the router. When the router's Wi-Fi status LED is solid green or blue, it is ready to pair.
- On a device connected to the router, open any web browser, and log in to the admin web UI at http://192.168.1.1.
- Navigate to Network > Wi-Fi and ensure that the Enable Mesh Network slider is on.
- Power on the X700. You can use the provided AC adapter, a USB-powered hub, or USB power delivery (PD) host equipment. When the X700 LED is blinking green, it is ready to pair.
- Pair the X700. You can pair your X700 with an Inseego router using Wi-Fi or Ethernet.
Pairing via Wi-Fi
To initiate Wi-Fi pairing, use the interactive device display on the router or the admin web UI.
- Using the router’s device display
- Ensure the router and mesh node are within 10 to 50 feet of one another. You can position the mesh node after pairing.
- Press the device display button repeatedly until you see Wi-Fi Mesh: Hold button to add.
- Press and hold the device display button.
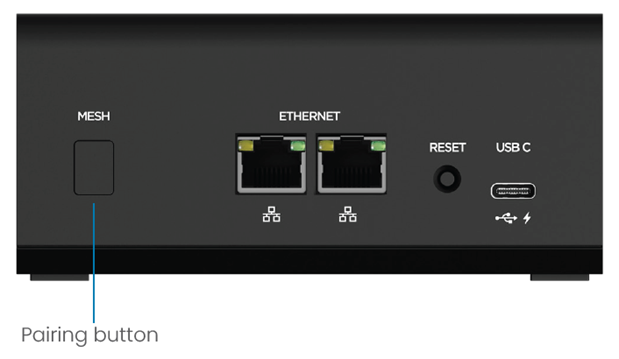
- When prompted by the display, press the Mesh button on the back of the X700 within 30 seconds.
- Wait – pairing takes 2 – 3 minutes. The light on the X700 and the Wi-Fi status LED on the router blink blue while pairing.
- When the display shows Wi-Fi Mesh: Paired! and the LED on the mesh node is a solid color, pairing is complete.
OR
- Using the admin web UI:
- Ensure the router and mesh node are within 10 to 50 feet of one another. You can position the mesh node after pairing.
- Go to http://192.168.1.1 to access the admin web UI for the router. Navigate to the Mesh Network section on the Network > Wi-Fi tab.
- Click Add Node on the admin web UI Wi-Fi tab.
- Within 30 seconds, press the Mesh button on the back of the X700.
- Wait – pairing takes 2 – 3 minutes. The light on the X700 and the Wi-Fi status LED on the router blink blue while pairing.
- When Wi-Fi status LED on the router is solid blue and the LED on the mesh node is a solid color, pairing is complete.
Pairing via Ethernet
- Connect an Ethernet cable from the X700 to a LAN port on the router.
NOTE: The router and mesh node must be within 300 feet of each other.
- Pairing is automatic. The LED on the X700 blinks blue while pairing. When pairing is complete, the LED is solid.
- When you disconnect the Ethernet cable, the X700 remains paired via Wi-Fi.


