EDGE Manager quick start guide
- Product documentation
- Inseego 5G SD EDGE™
- EDGE Manager quick start guide
Onboard devices in EDGE Manager
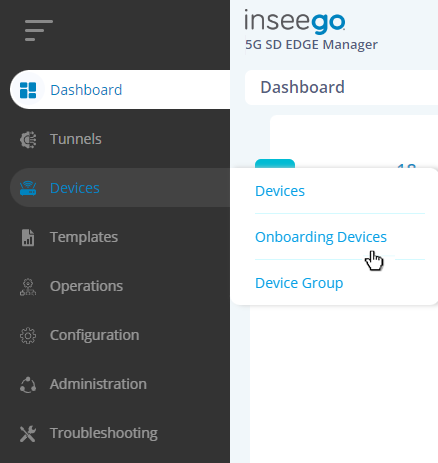
In the side menu of EDGE Manager, hover over Devices and select Onboarding Devices.

A list of devices currently onboarding appears.
NOTE: Use the buttons in the upper right to refresh the list, filter, sort columns or approve or delete a device.
Click the plus sign  next to Onboarding Devices.

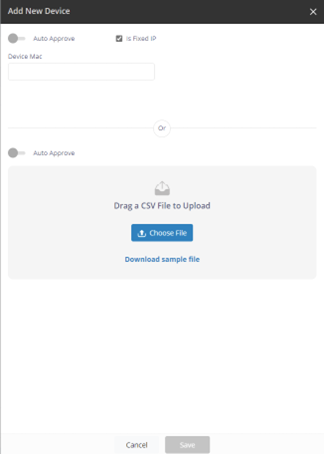
The Add New Device dialog appears.

You can onboard devices manually using a MAC address or add devices using Auto Approve.
Adding devices manually
You can manually onboard a single device by entering the MAC address, or you can onboard multiple devices at the same time by creating a CSV file containing the MAC addresses of multiple devices and upload it.
- MAC address – enter the MAC address in the Device MAC text box.
- CSV file – Click Choose file and select a CSV file containing the MAC address of the devices you wish to upload.
TIP: Click Download sample file to use as a template for your CSV file.
If the IP for the device(s) is not fixed, uncheck the Is Fixed IP checkbox.
Click Save. The device(s) you onboard appear(s) in the table on the Onboarding Devices page.

Verify the MAC address of the added device(s), then select the row(s) and click the Approve button. A pop-up appears.
Confirm you want to approve the device(s) by clicking OK. After the approval process is completed for the device(s), the device(s) automatically move(s) to the Devices page.
NOTE: Once devices are onboard, they display in Zabbix with a green availability status and the bootstrap template is applied in EDGE Manager.
Adding devices with Auto Approve
You can onboard a devices or multiple devices to be automatically approved with the registration process completed from the local GUI.
- MAC address – enter the MAC address in the Device MAC text box.
- CSV file – Click Choose file and select a CSV file containing the MAC address of the devices you wish to upload.
TIP: Click Download sample file to use as a template for your CSV file.
If the IP for the device(s) is not fixed, uncheck the Is Fixed IP checkbox.
Click Save. The device(s) you onboard appear(s) in the table on the Onboarding Devices page as Auto Approved. Once registration completes for the device(s) from the local GUI and the ZTP handshake completes, the device(s) automatically move to the Devices page.
NOTE: Once devices are onboard, they display in Zabbix with a green availability status and the bootstrap template is applied in EDGE Manager.
